C-Level Cirque Hike Guide – Banff
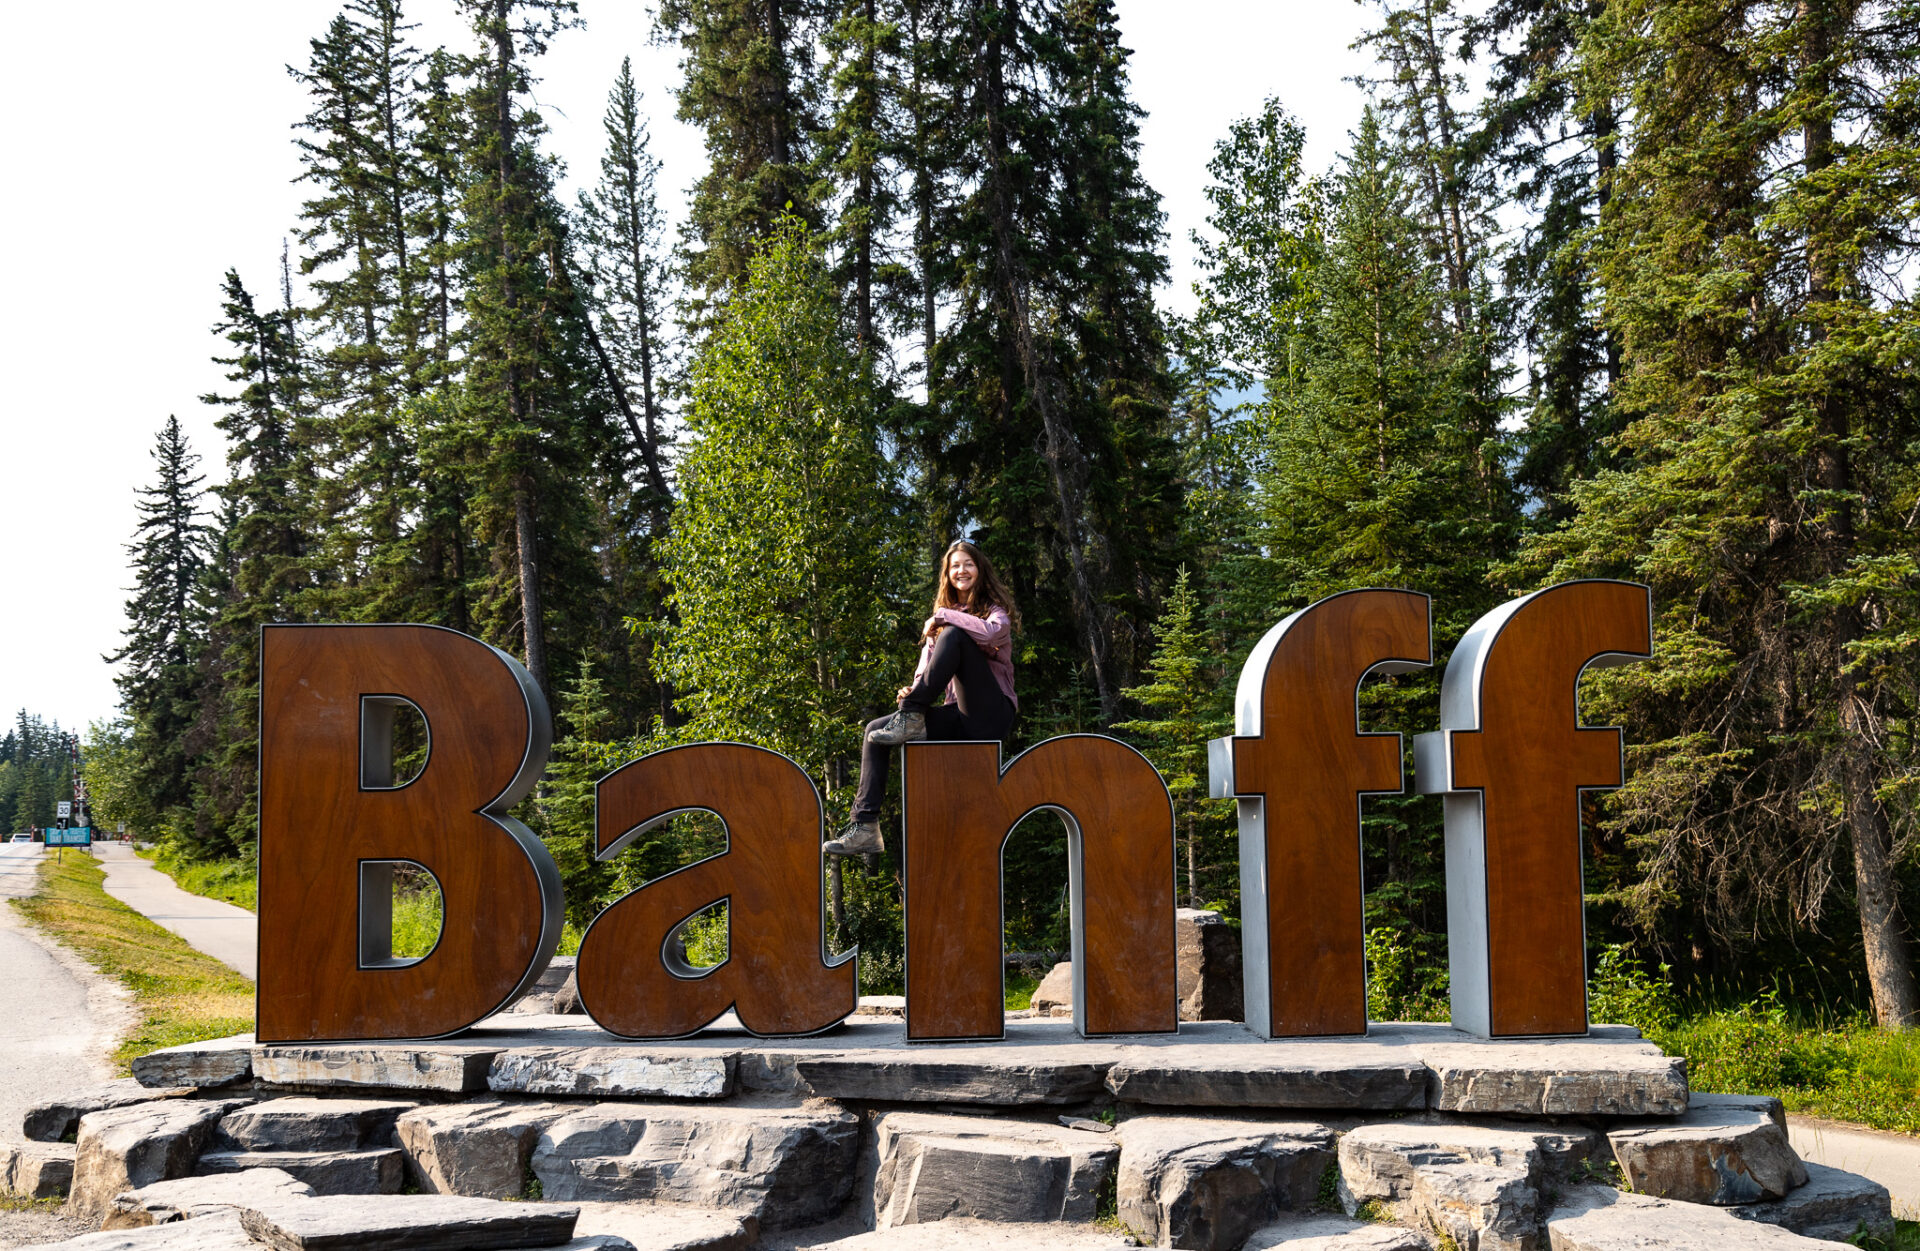
The C-Level Cirque hike in Banff is a great, relatively quick trail that offers epic views of Lake Minnewanka and the Bow Valley. The C Level Cirque trailhead is close to the town of Banff which makes this an easy hike to add to your Banff bucket list.
C Level Cirque is a great trail for everyone, no matter your previous hiking experience or skills. In this guide I’ll cover trail information, how to get to the C Level Cirque hike, and provide some quick tips and useful information to ensure your hike is a success.
Skip Ahead:
- How to get to the C-Level Cirque trailhead
- Canadian Rockies hiking & camping tips
- Where to stay in Banff
- About C-Level Cirque hike
- Hiking C-Level Cirque
- Recommend hiking gear
I have affiliate links in this post which means when you book a hotel or purchase a product, I may make a small commission ~ at no additional cost to you (full disclosure). These funds go back into The Holistic Backpacker and help me create more free content like this!
Thank you for supporting my work!
Interactive Banff Map – from a LOCAL
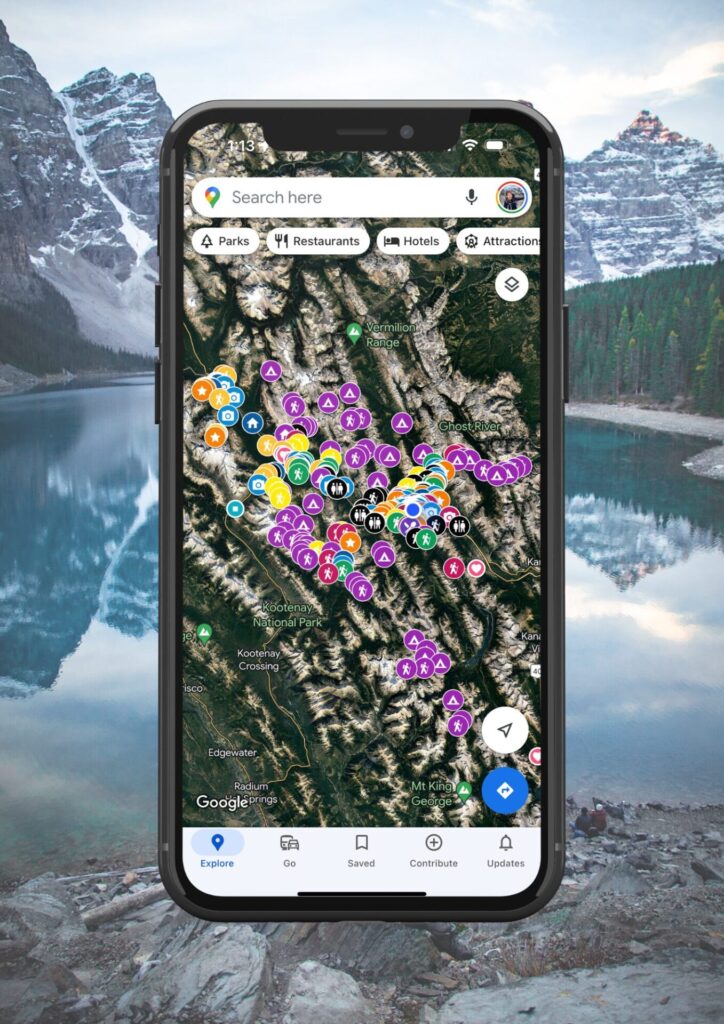
Get my 600+ local Banff recommendations saved to your Google Maps app
I lived in Banff for years & know all the best spots!
Outdoors: 100+ hiking trails, scrambles, backcountry routes, waterfalls & lakes
Planning: lodging, parking, restaurants, public washrooms, transit hubs, shopping & services
Things to do: tours, viewpoints, unique activities, & local secrets
Quick Banff Guide
RENT A CAR: I highly recommend renting a car to explore Banff’s remote trailheads and attractions not accessible by public transport. My favourite site to find the best local rental deals is this one.
How to get to Banff: fly into Calgary International Airport. From here, rent a car (what I recommend) or take one of the following shuttles to Banff: On-It (budget) runs during the summer months | Pop-a-Ride is a ride-share program – you can use my Poparide link to save $5 on your first trip | Banff Airporter and Brewster are professional services.
Moraine Lake & Lake Louise: read my guide for how to get there with the new road closures. If you want to see Moraine Lake at sunrise, you can book a shuttle here.
Best Activities in Banff: here are all my recommendations for the best tours, activities, and unique experiences in Banff & beyond.
Lodging & Camping: see my guide which outlines the best hotels in Banff by category. Summer and peak winter visits require advance bookings. Camping reservations must be made on the Parks Canada reservation system which typically opens in January – make your reservations then.
First time visiting Canada? This page outlines all my travel tips for those new to Canada.
When to visit: this post breaks down each month in Banff with average temps and corresponding activities.
Reservations: for activities and restaurants, reservations should be made in advance during summer and holidays. Get Your Guide and Viator are popular tour booking platforms whereas OpenTable is used for restaurants.
Parks Pass: your vehicle needs a parks pass which can be purchased from the East Parks Gates, the Visitor Centre, or online. An annual Discovery Pass is more economical if you’ll be in Canada’s National Parks for more than 7 days in 1 year.
Roam Transit: in Banff, use the local transit service, as much as possible to avoid parking issues in popular places like Lake Louise and Johnston Canyon.
Parking: use the large free lot next to the train station. More town parking info can be found here and parking fees can be paid here.
Wildlife Safety: 11 ways to stay safe from wildlife, bear safety, & bear basics.
My Featured Banff Blogs
Travel Guides
Banff Activities
C Level Cirque hike, Banff
Canadian Rockies Hiking Tips
Guides for hikes in: Banff | Jasper | Kananaskis | Kootenay | Waterton | Yoho
Approach: take a conservative approach if you’re new to hiking and ensure you have lots of daylight. Trails here are steep, long, and can have challenging terrain.
Best Time of Year: July to early September is the most reliable for weather and minimal snow. This post outlines each month in Banff.
- Hiking in winter? Stick to easy, well-trafficked trails unless you’re knowledgeable about avalanche terrain. I always check the avalanche bulletin and use both Caltopo and Google Maps satellite view to survey terrain before hiking.
Pets: leashed dogs are allowed on all trails in the Rockies unless otherwise stated.
Safety: tell someone where you’re going and when you plan to return. I always carry the Garmin InReach Mini for additional safety as there’s minimal cell service in the Rockies.
Wildlife: carry bear spray and know how to use it. Here are bear safety tips from Parks Canada.
Maps: I purchase the Alltrails+ membership and download my maps before hiking so I always know where I am.
Helpful Canadian Rockies Hiking Posts:
More of my detailed hiking tips can be found here
Canadian Rockies Camping Tips
Plan to go camping in Banff and the Canadian Rockies? Here are some useful things to know.
Unless you’re on some form of public land – random camping and free car camping is not permitted in the Canadian Rockies. If you do plan to “free” camp in the designated areas, you must purchase the Public Lands Camping Pass.
Camping Reservations: reservation day (when bookings go live) usually occurs in January. Most summer camping reservations must be made then as sites fill up instantly.
- National park camping reservations can be made here and Kananaskis reservations can be made here: backcountry | front country.
- Can’t get a reservation? Sign up for cancellation notifications via Schnerp. I use this resource frequently and have found cancellations at the most popular spots in the Rockies like Lake O’Hara.
When to Camp: most campgrounds close for the winter, however a few remain open year round. July-August is best for backcountry camping. Keep in mind, temperatures are typically very cold at night even during peak summer.
Hut Camping: the Alpine Club of Canada has established alpine huts scattered around the Rockies and beyond. These huts must be booked in advance and cater to backcountry skiers, hikers, and climbers.
Packing advice and my personal gear recommendations can be found in my Backcountry Gear Guide.
C Level Cirque hike, Banff
How to Get to the C-Level Cirque Trailhead
The C Level Cirque trailhead is located at the Upper Bankhead parking lot along the Lake Minnewanka Scenic Dr. This spot is just a 12 minute (8.5km) drive from the town of Banff or a 1hr 20mins (125kms) drive from Calgary.
The west side of the Lake Minnewanka Scenic Dr experiences an annual vehicle closure from November to May which means if you want to hike C Level Cirque during these dates you’ll need to park at Lake Minnewanka and walk/bike from there. It’s around 2.4kms (one-way) with some elevation changes – 30 minutes via walking or 10 minutes via biking.
More information about the Lake Minnewanka road closure can be found here.
If you’re travelling to Banff sans-vehicle, you can opt to take line 6 with Roam Transit from downtown to Lake Minnewanka. You can reference the above walking/hiking stats from the lake to the Upper Bankhead parking lot for distance/time info. Bus fees are $2 per person, per trip and can be paid in exact change at the time of boarding or via the ‘Token Transit’ app.
Alternatively, you can rent a car to get to the C Level Cirque trailhead. I always recommend using this website to find the best rates, however I’ve also listed Canadian car rental options here.

Best Banff Car Rentals
Most of Banff’s remote trailheads and attractions are inaccessible via public transportation. I 100% recommend renting a car to make the most of your time in the Rockies.
My favourite rental tool is this site as it compares all the local car rental shops to find you the best rate.
Connect via socials:
STAY CONNECTED
Sign up for emails to receive a 25% discount on my travel maps.
Taylor ♡
Where to Stay in Banff
From hostels to camping to luxury hotels – Banff has accommodations for everyone. Here are my top recommendations for where to lodge in Banff based on every budget.
I recommend giving this post a read as I’ve listed every Banff hotel worth staying at and organized them by category.
- Hostels – Samesun Banff (best location + bar/restaurant on-site), Banff International Hostel (second best), and HI Banff.
- Budget hotels – Bow View Lodge and High Country Inn.
- Mid-range stays – Banff Park Lodge, Mount Royal, Elk & Avenue, and the Banff Caribou & spa.
- Luxury stays – Fairmont Banff Springs and the Rimrock Resort.
- Cabin retreats: Johnston Canyon Bungalows, Baker Creek, and Castle Mountain Chalets.
- Camping – reservation information can be found here. Ensure you book campsites far in advance as they’re full during summer.
- For those on ski trips: lodge on-mountain at Sunshine Village, stay near Norquay, and see my Lake Louise suggestions below.
Lodging Options Near Banff
Enjoy the nature and activities of Banff National Park, but lodge away from the busy tourist town centre at any of the following:
- Lake Louise – Fairmont Chateau Lake Louise (luxury), Paradise Lodge & Bungalows (500m from the lake), Lake Louise Inn (value stay), HI Lake Louise (hostel).
- Canmore – Malcolm Hotel (luxury), Stoneridge Mountain Resort (condo suites with fully equipped kitchens), Mountain View Inn (budget), Canmore Downtown Hostel & the Canmore Hostel (party hostel).
- Johnston Canyon – Johnston Canyon Lodge & Bungalows, Castle Mountain Chalets, and HI Castle Mountain Hostel.
- Yoho National Park – Emerald Lake Lodge and Cathedral Mountain Lodge.
- Kootenay National Park – Storm Mountain Lodge & Cabins.
- Kananaskis Country – Mount Engadine Lodge and Kananaskis Mountain Lodge (luxury), Crosswaters Resort (mid-range), and HI Kananaskis Wilderness Hostel (budget).
Interactive Banff Map – from a LOCAL
Get my 600+ local Banff recommendations saved to your Google Maps app
I lived in Banff for years & know all the best spots!
Outdoors: 100+ hiking trails, scrambles, backcountry routes, waterfalls & lakes
Planning: lodging, parking, restaurants, public washrooms, transit hubs, shopping & services
Things to do: tours, viewpoints, unique activities, & local secrets
About the C-Level Cirque Trail
ps – C Level Cirque + every other hike in Banff is marked on my Banff & Lake Louise map.
- Distance: 9.8km
- Elevation gain: 781m
- Rated: moderate
- Type of trail: out & back
- Estimated time: 4 hours
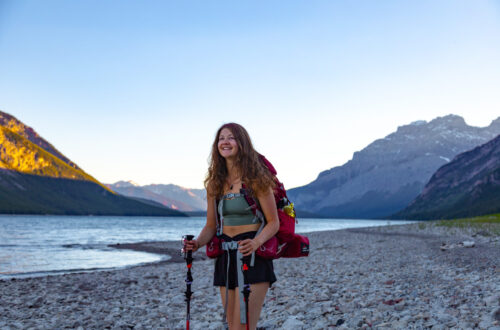
The C Level Cirque hike is a beginner and family-friendly trail suitable for hikers of all abilities and ages. The trail is well trafficked, so if you’re looking to “beat the crowds” start this hike early or go up for sunset.
ps – sunset is the best time of day to hike C Level Cirque. The evening alpenglow lights up the west side of Mount Inglismaldie giving the area a golden glow.
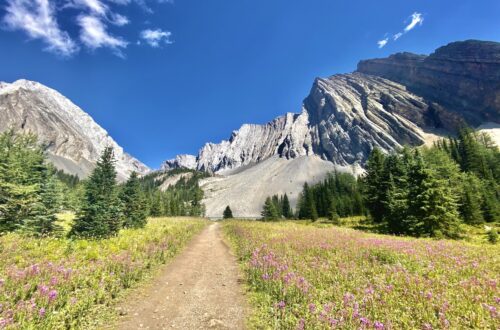
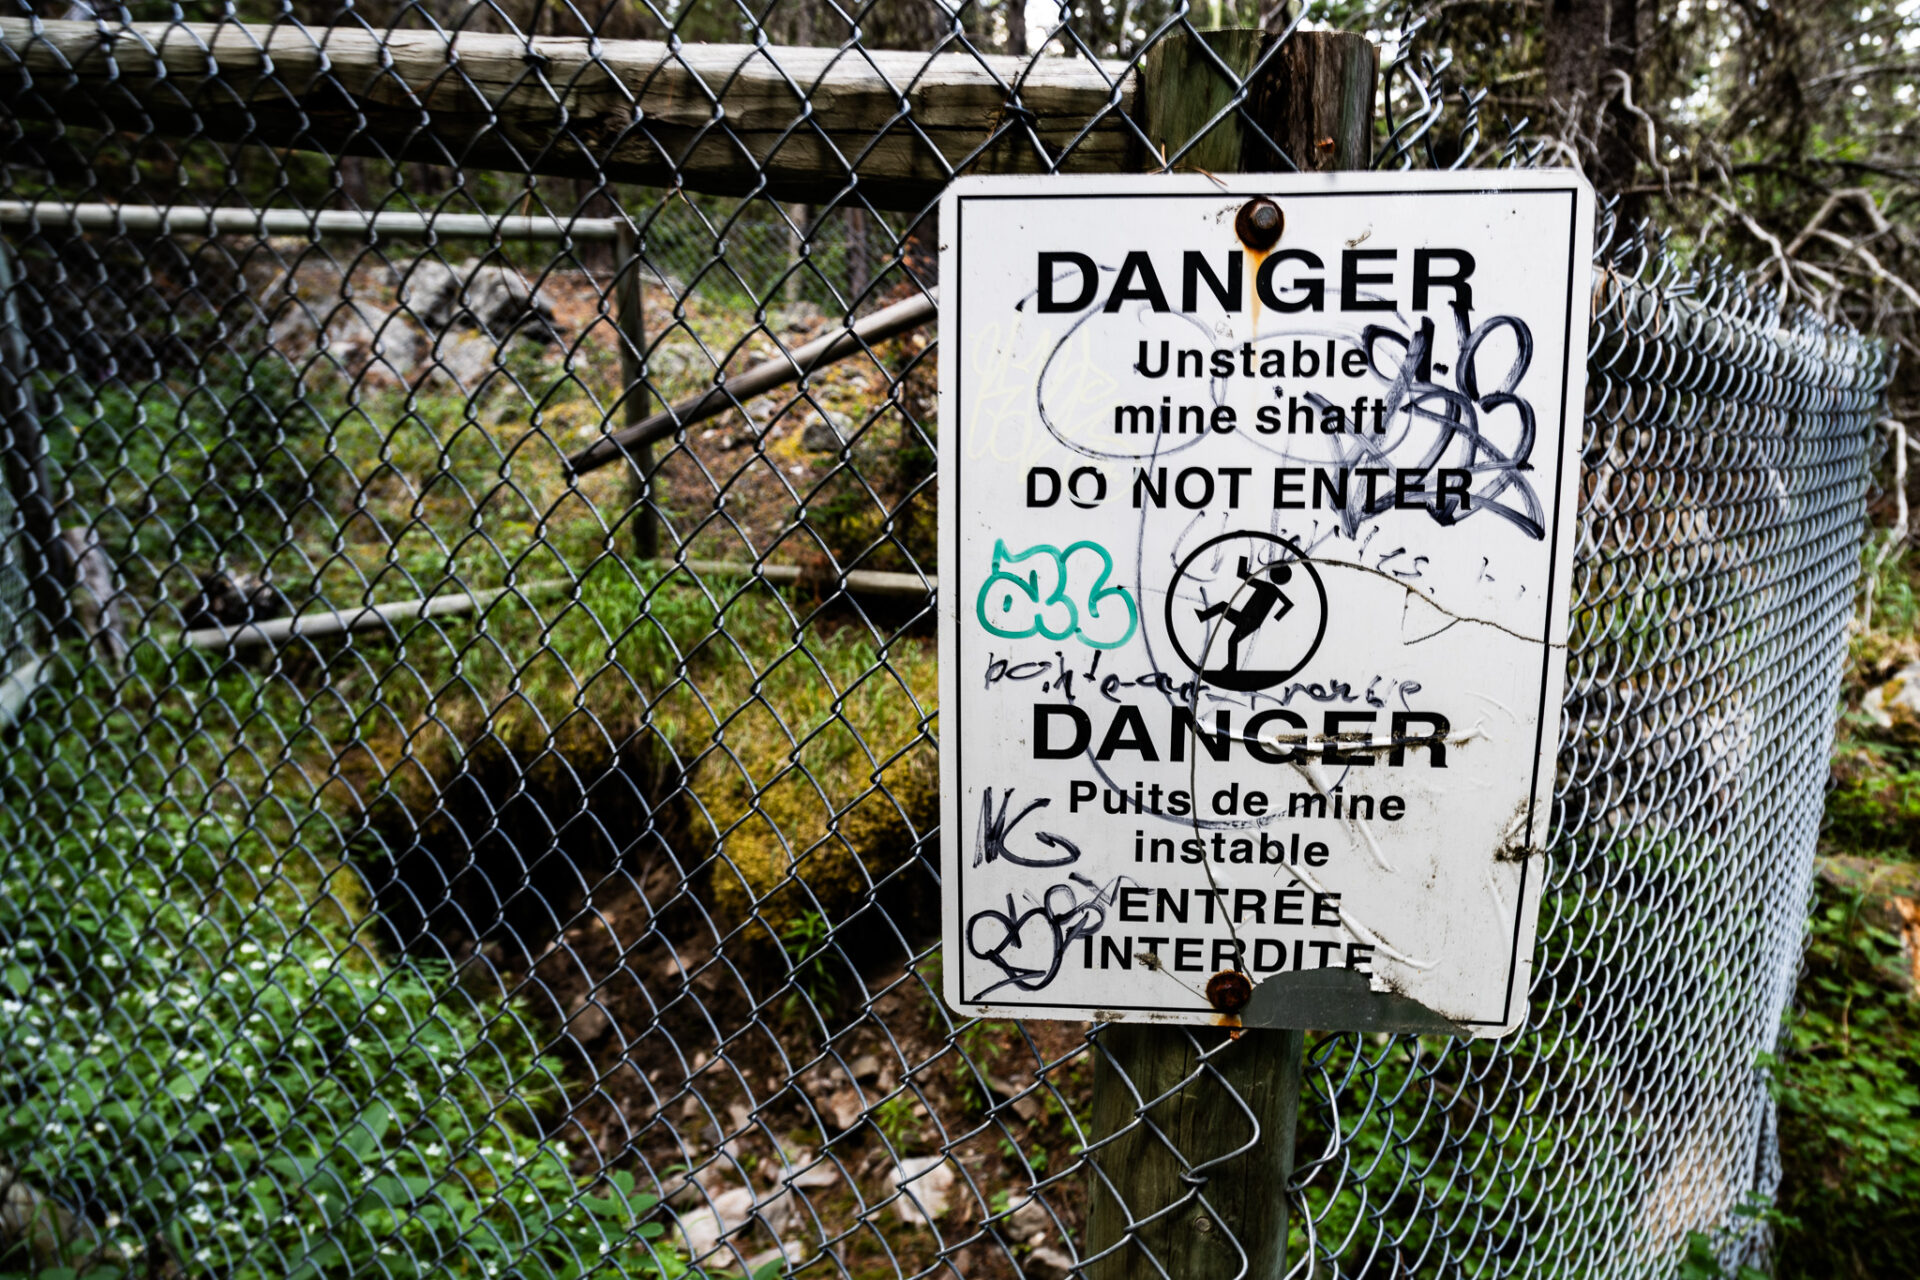
The C Level Cirque trail begins by following a forested route with moderate, but steady incline for the first 4kms. There are plenty of exposed roots on the trail, so sturdy shoes are recommended. Along the way you’ll find remnants of fenced off mining shafts and stone buildings from Banff’s mining era.
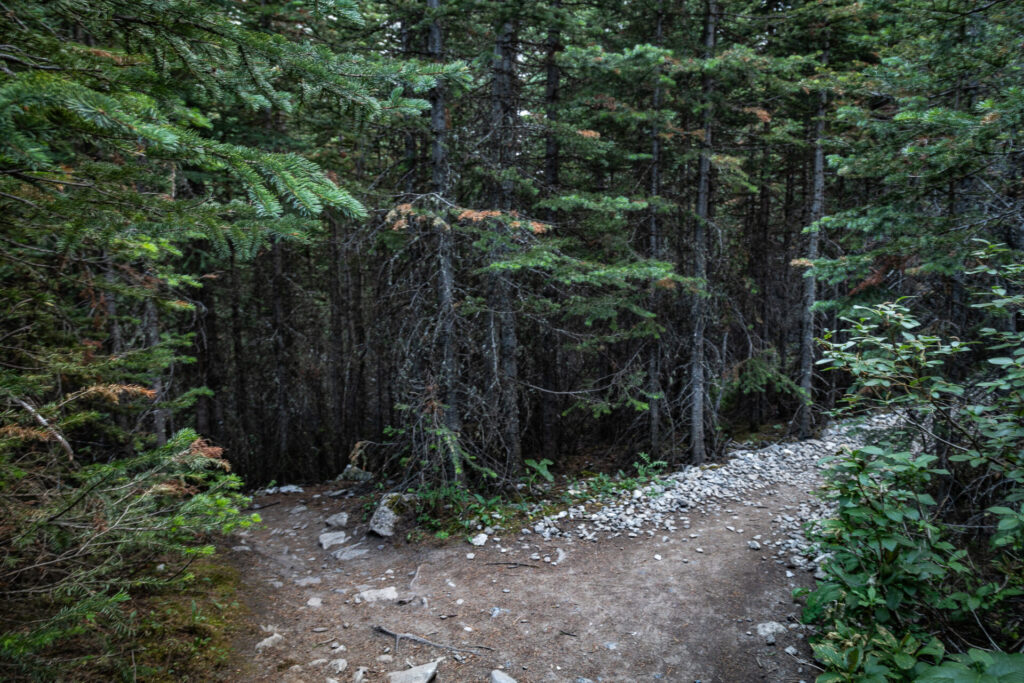
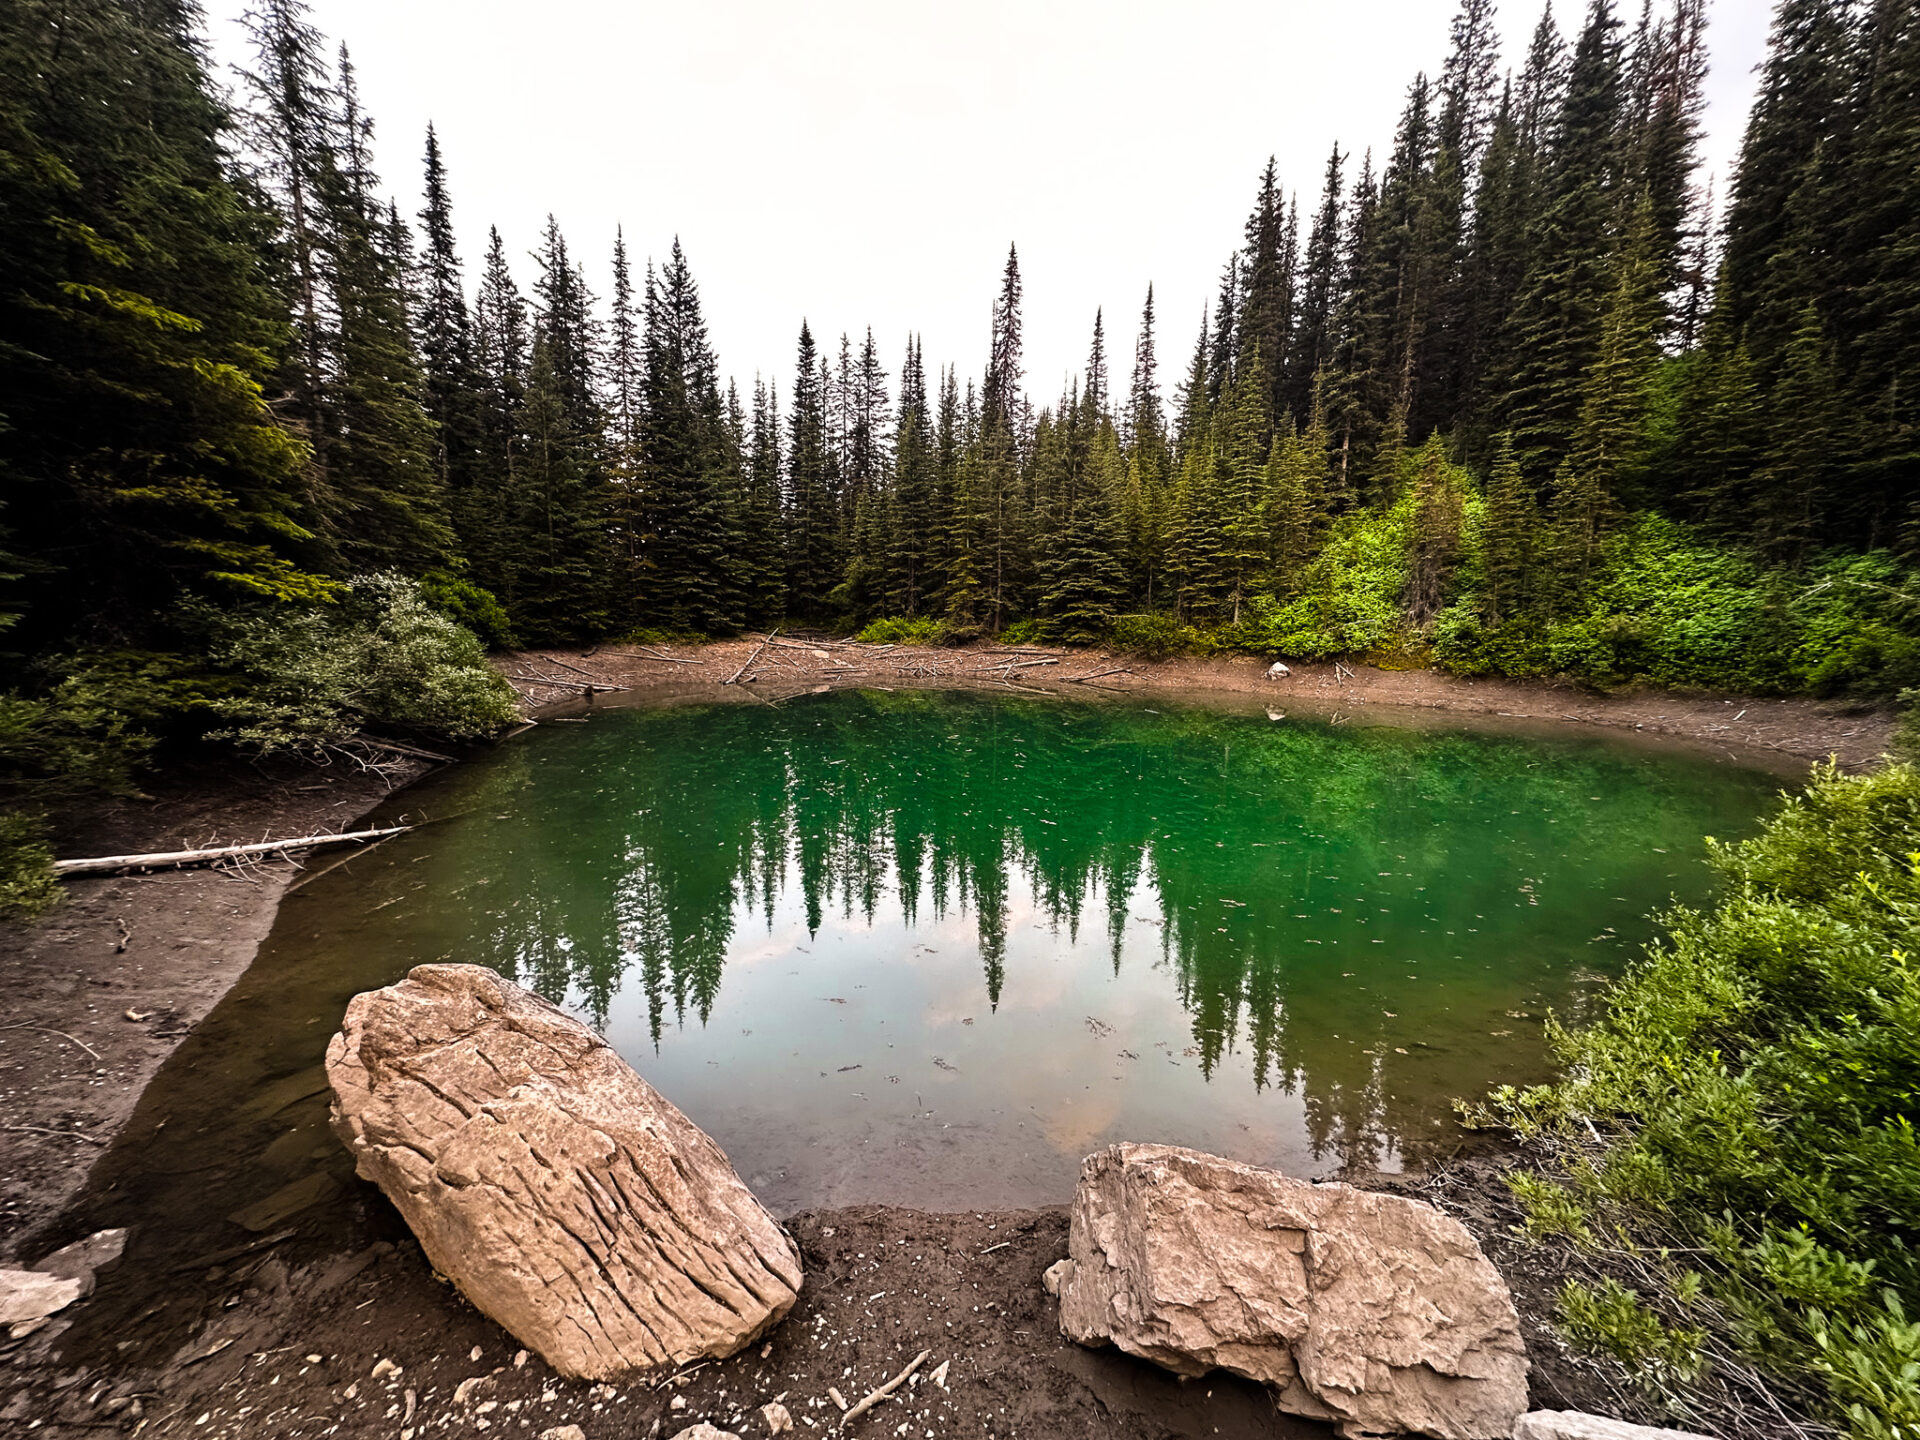
Toward the end of the forested section, the trail comes to a fork. Hiking left will take hikers to a small green pond. Hiking right will take hikers to the lookout.
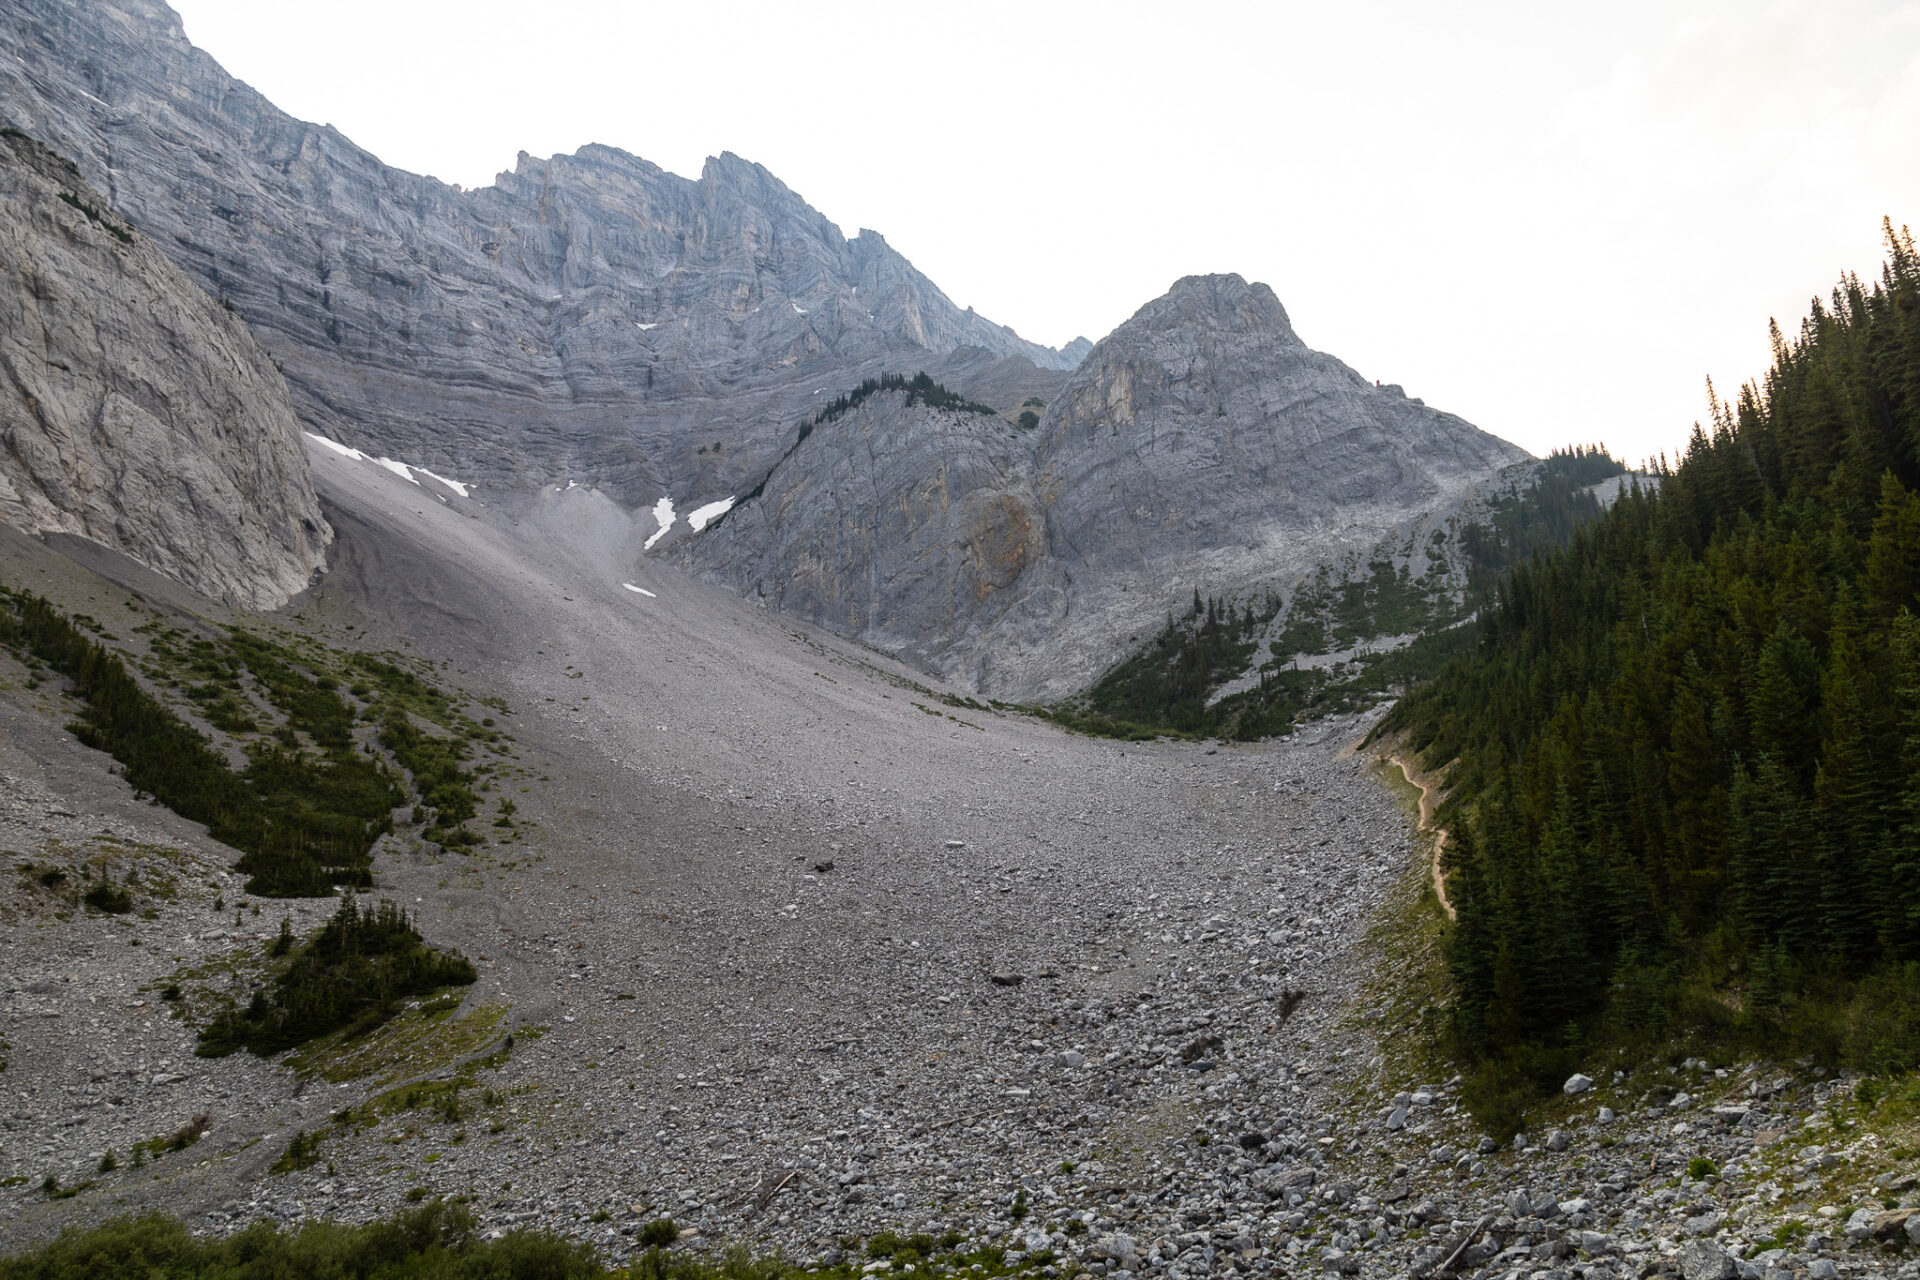
After turning right and exiting the trees, hikers will find a large rock field to the left called a cirque – aka an amphitheatre-like valley formed by glacial erosion. The trail continues at the bottom (hiker’s right) of the cirque. Eventually you’ll re-enter the trees where the packed terrain becomes gradually steeper closer to the lookout – poles are helpful here.
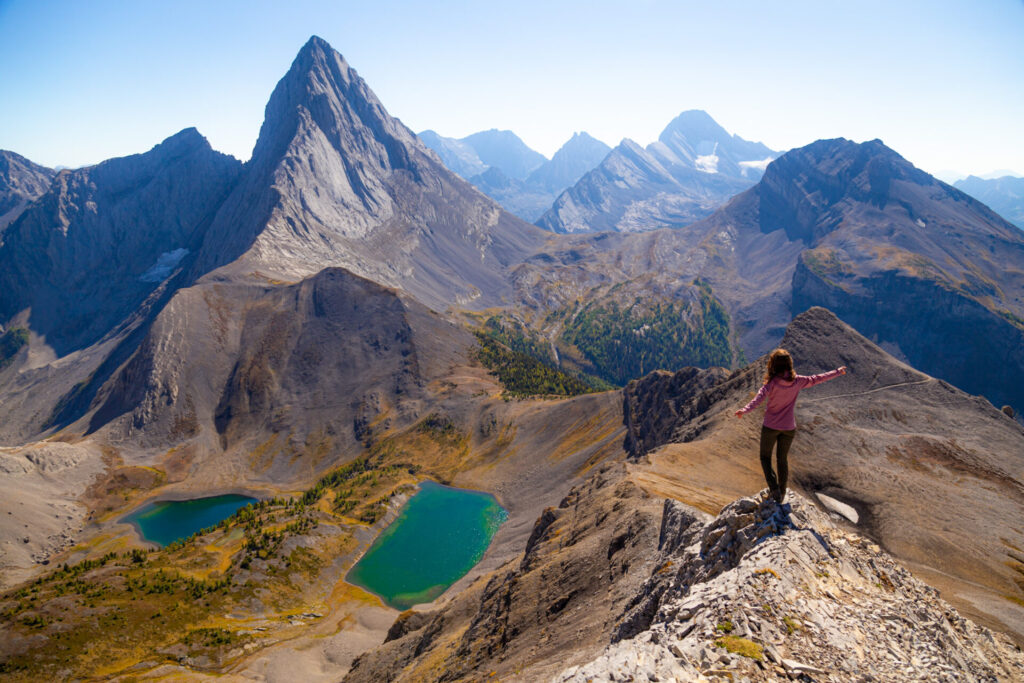
The C Level Cirque lookout is only a small area so it can get crowded if you opt to hike during midday when it’s busiest. You can scramble up a bit higher than the main lookout area for better views.
The best time of year to hike C Level Cirque is from May to October. There’s often snow here until late in the season which poses some avalanche risk. If you hike early in the season, it may be a good idea to bring spikes. I have my favourite spikes linked below.
The C Level Cirque trail experiences heavy bear activity. Make sure you pack bear spray. Hiking in groups is also recommended.
My Favourite Activities in Banff
Banff Gondola – epic views from the top of Sulphur Mountain.
Banff Hop on Hop off – explore the park at your own pace.
Lake Minnewanka Cruise – take a scenic boat ride down the largest lake in Banff.
Moraine Lake sunrise – chartered bus to see alpenglow on Canada’s most beautiful lake.
Norquay via ferrata – epic beginner friendly climbing route across iron bars on Mt Norquay.
Sunshine Meadows Gondola – find wild alpine flowers and hike around pristine alpine lakes.
Click here for a complete list of the Banff tours I recommend:
Hiking C-Level Cirque
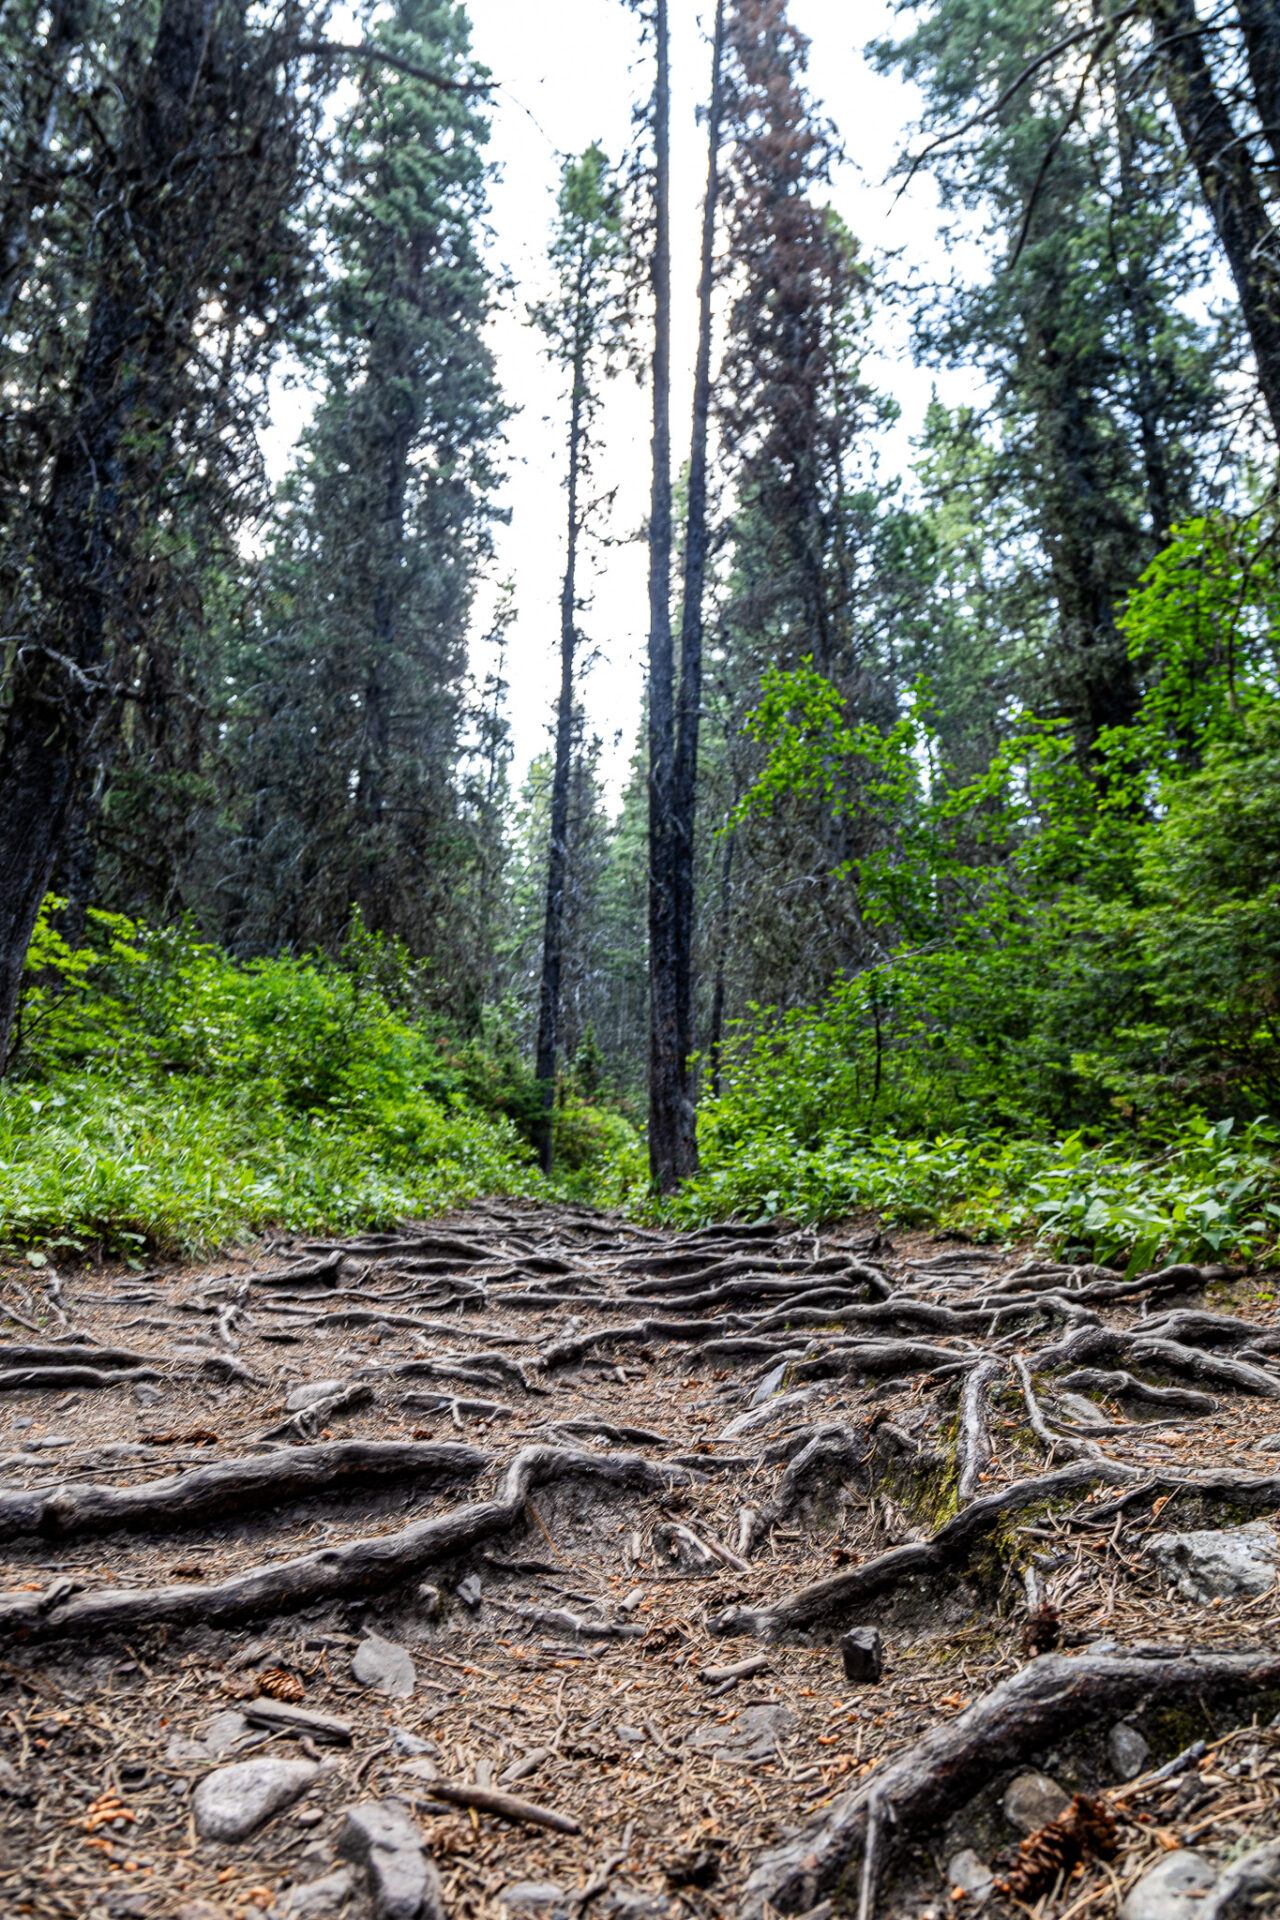
For the first 4kms of C Level Cirque, hikers can expect continuous and moderate elevation through a forested section with plenty of roots exposed. The terrain is not technical and you’ll fly through this section – but watch your step!

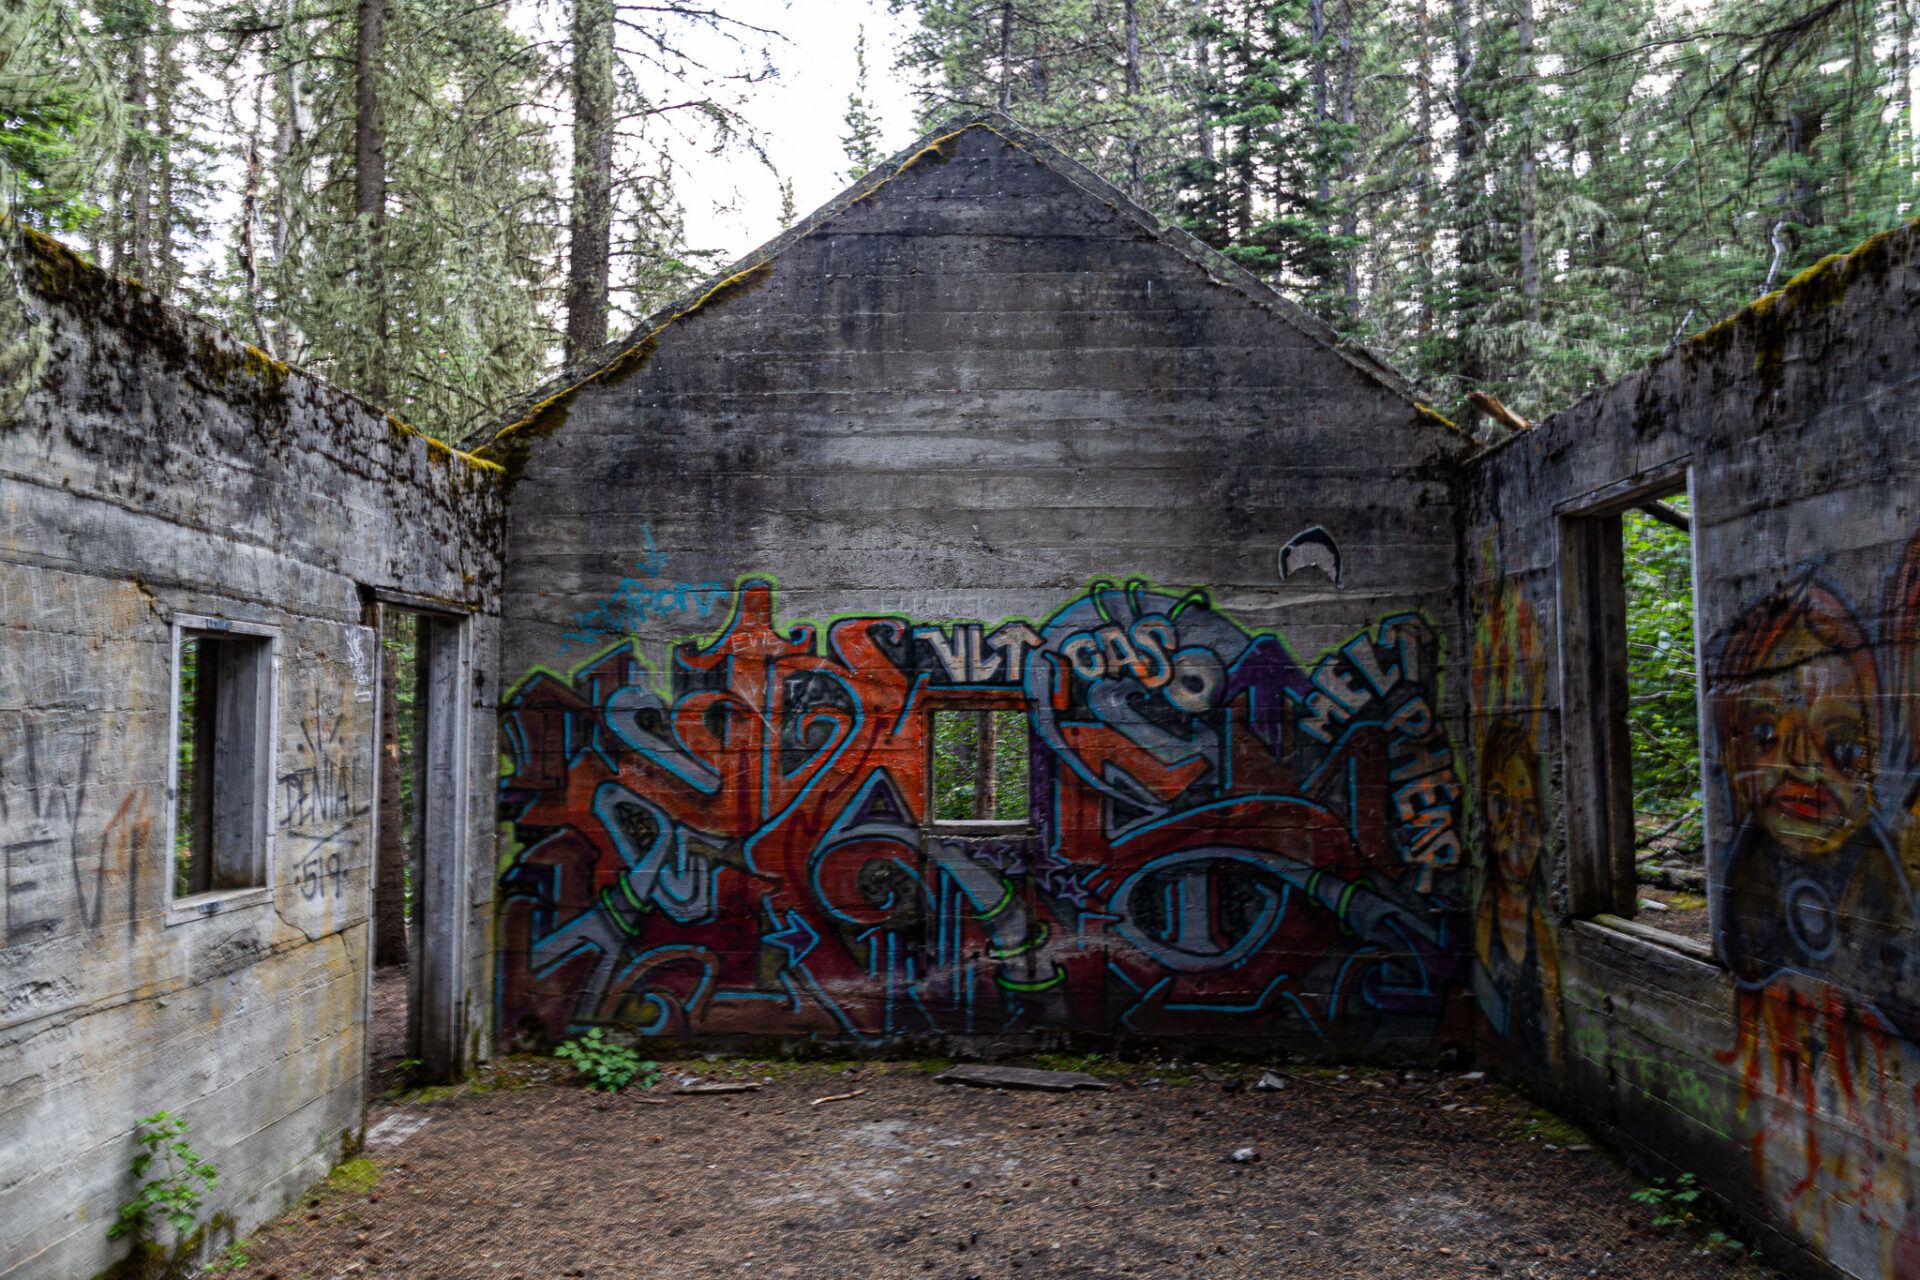
About halfway up the forested route there are remnants of historic mining buildings and mining homes which have been converted in graffiti. There’s a bench here which makes for a great spot to take a breather or grab some water.
Nearby there are also fenced off areas which mark the actual entrances of the mine shafts that used to operate within Cascade Mountain. Pretty cool!
Toward the end of the forested section of the C Level Cirque hike, the trail splits. You can take a quick detour to the left to find the green pond pictured below. Alternatively continue hiking right to get to the lookout.
After exiting the trees you’ll find a large boulder field which is the “cirque.” The trail continues along the bottom right of the cirque – you can clearly see the trail outlined in the picture below.
Do NOT scramble up the cirque. I’ve done this hike twice and for some reason – don’t ask why – the first time I hiked I thought the viewpoint was up on the forested ledge over the cirque. Don’t be that person (me) who needlessly scrambles up the cirque. Stick to the trail!
Once the trail crosses the bottom of the cirque and reenters the forest, the last section becomes quite steep and feels like a bit of a slog. It’s short-lived though and soon you’ll find yourself at the C Level Cirque Lookout.
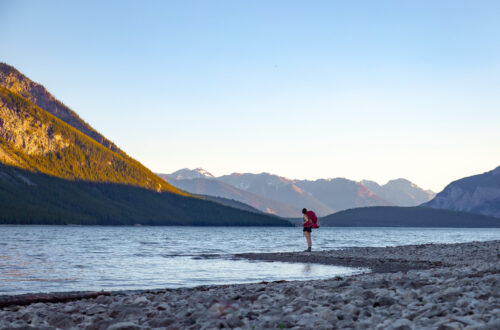
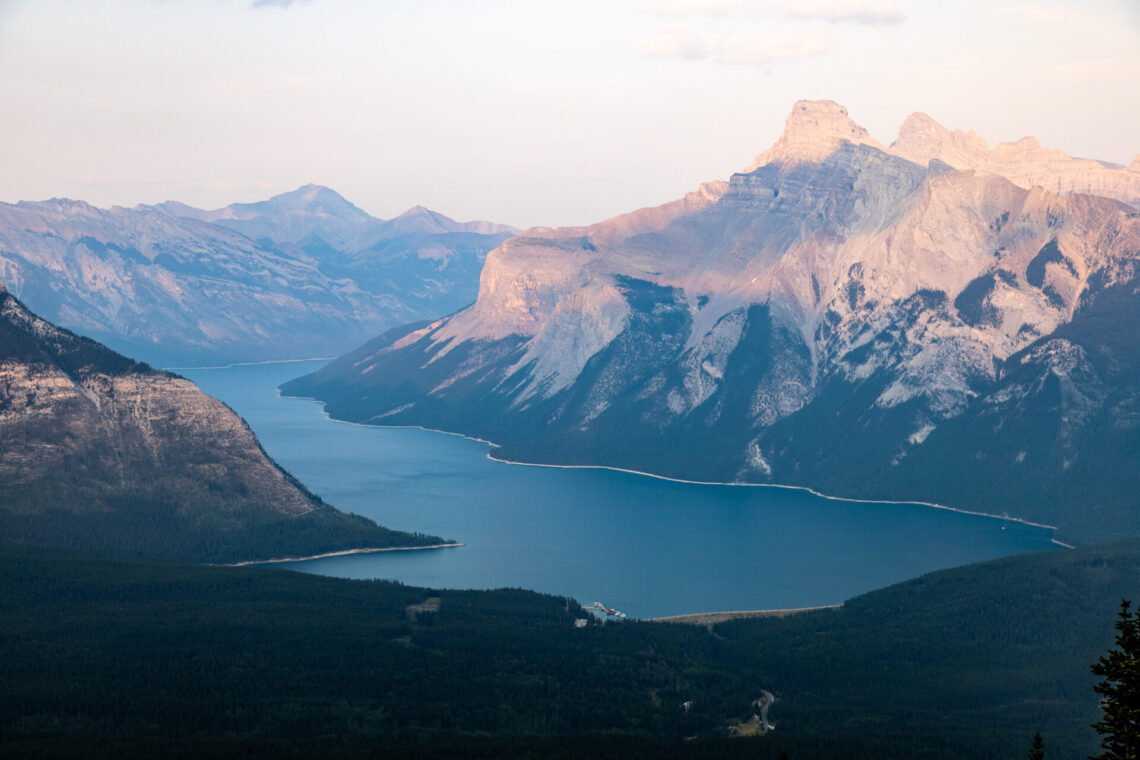
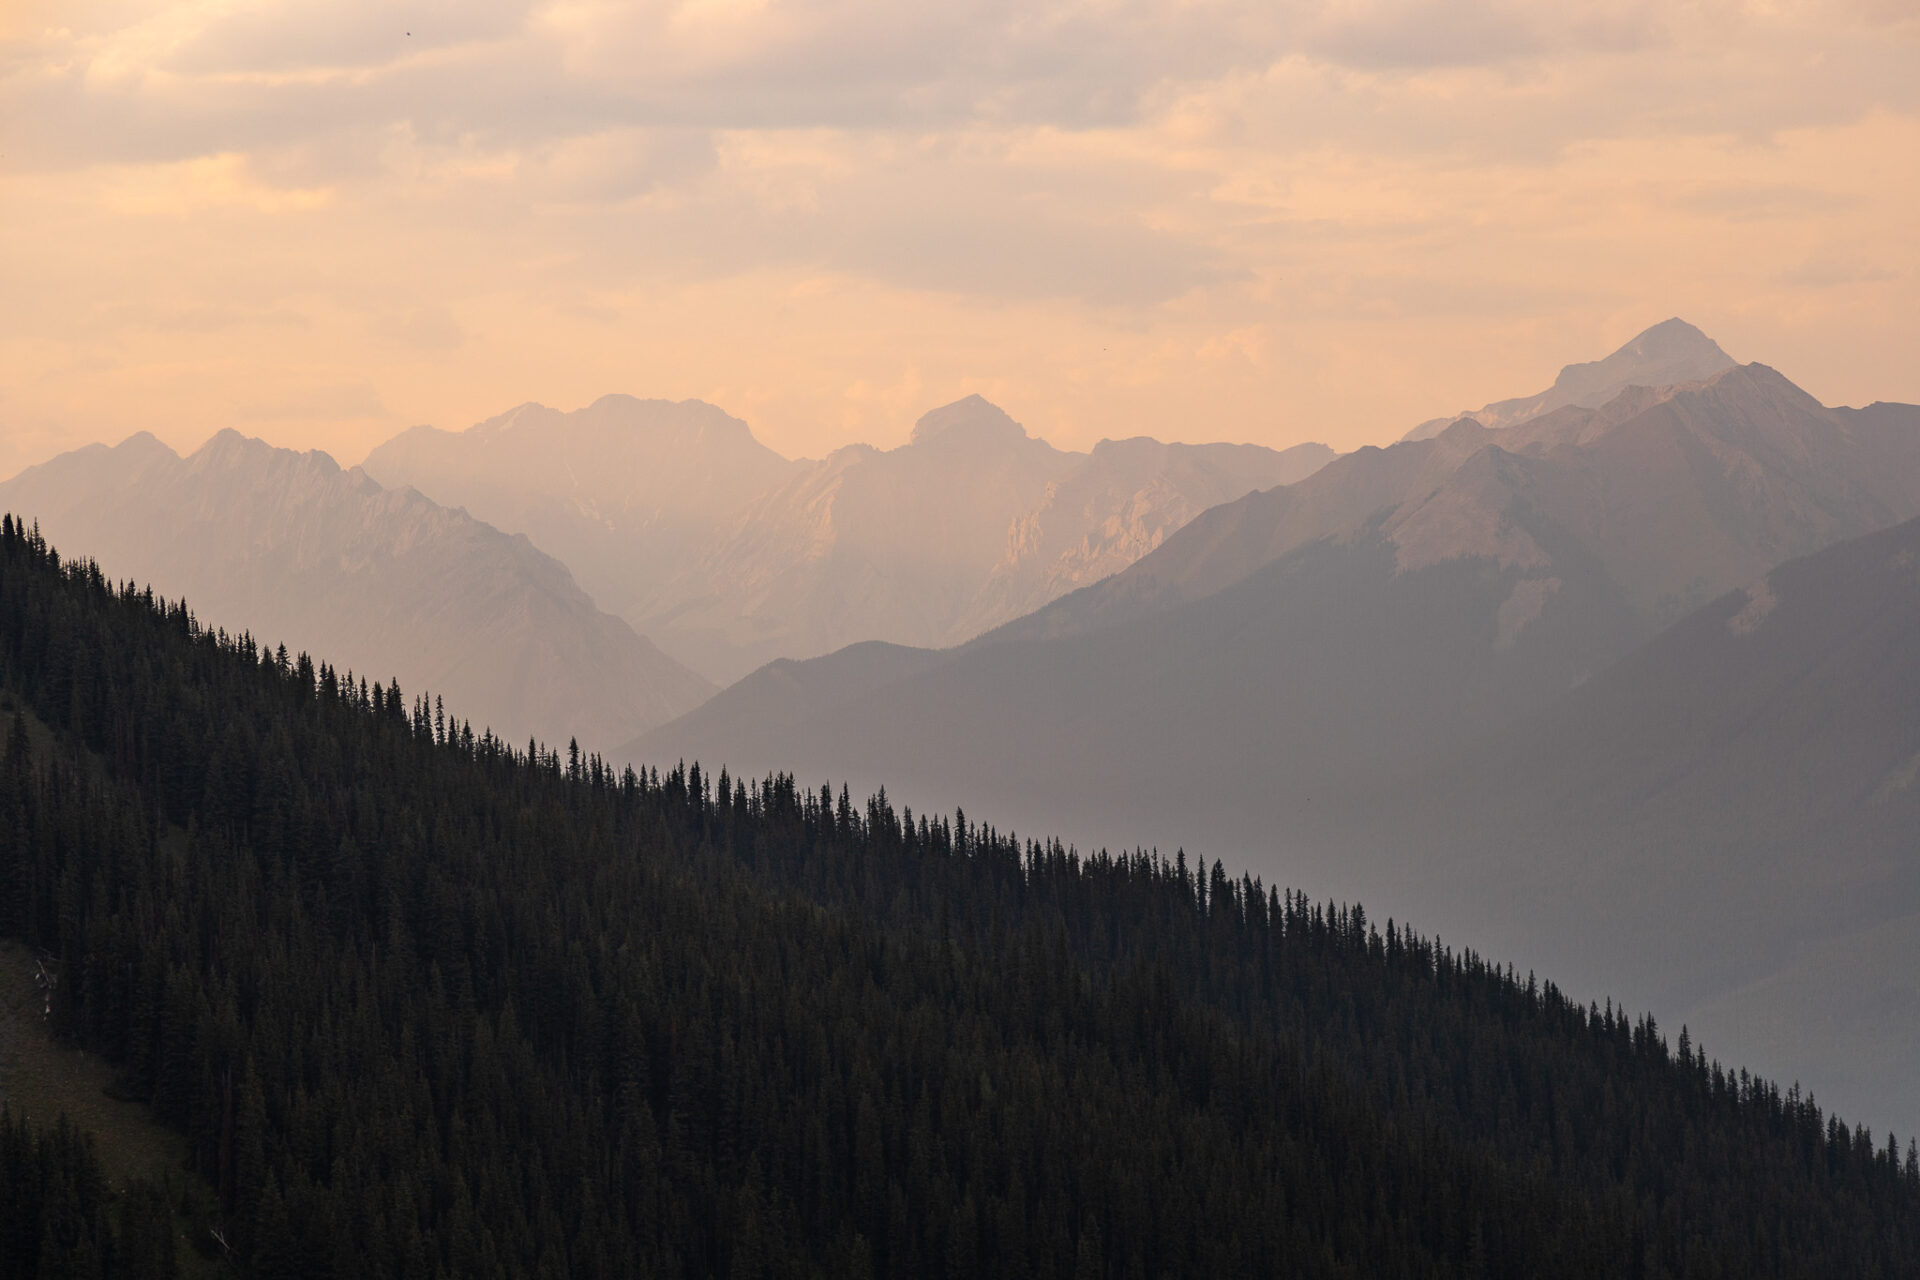
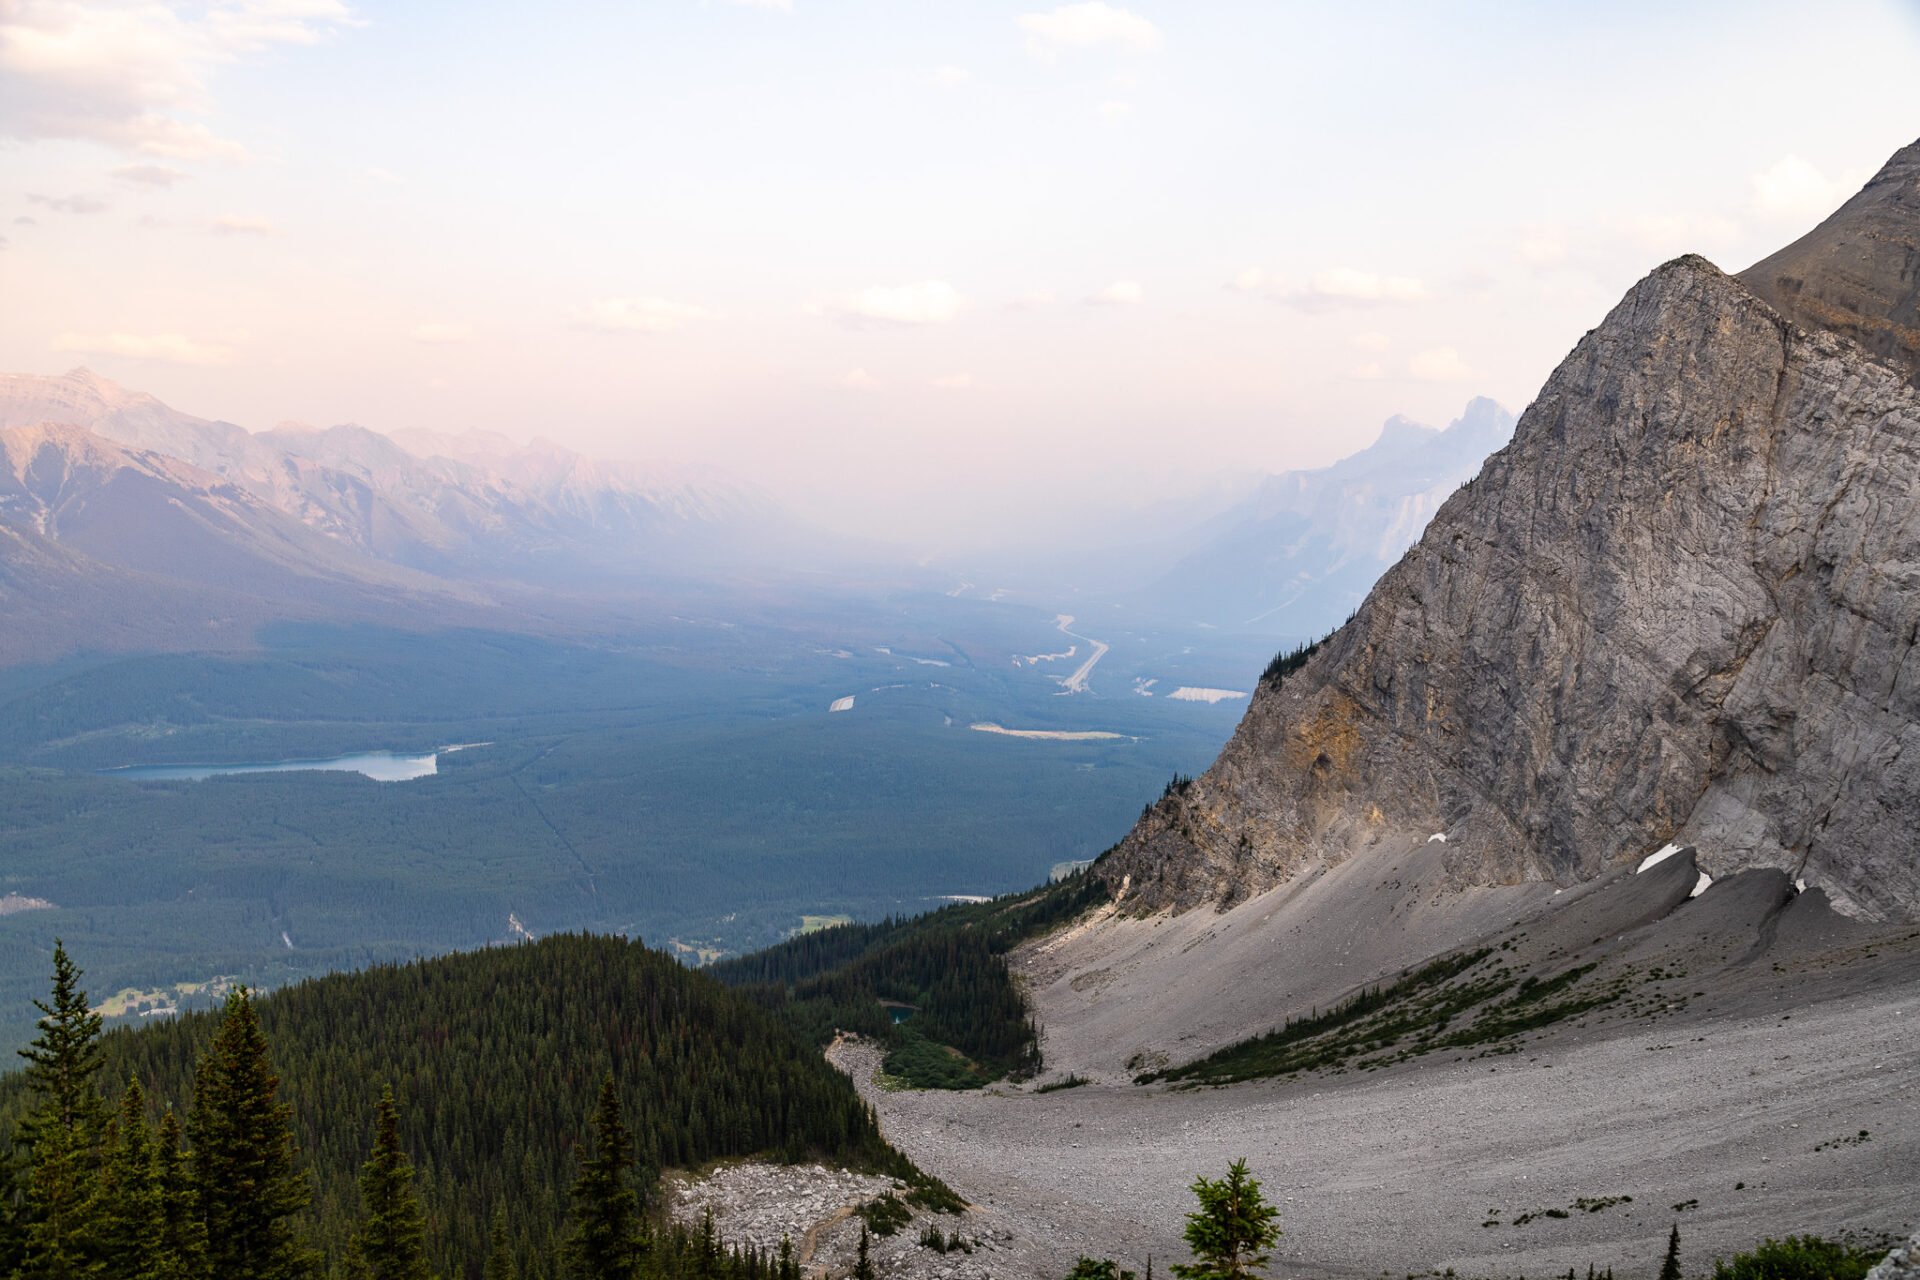
As you can see the C Level Cirque lookout is quite small, but you’ll find epic views of Lake Minnewanka up here.
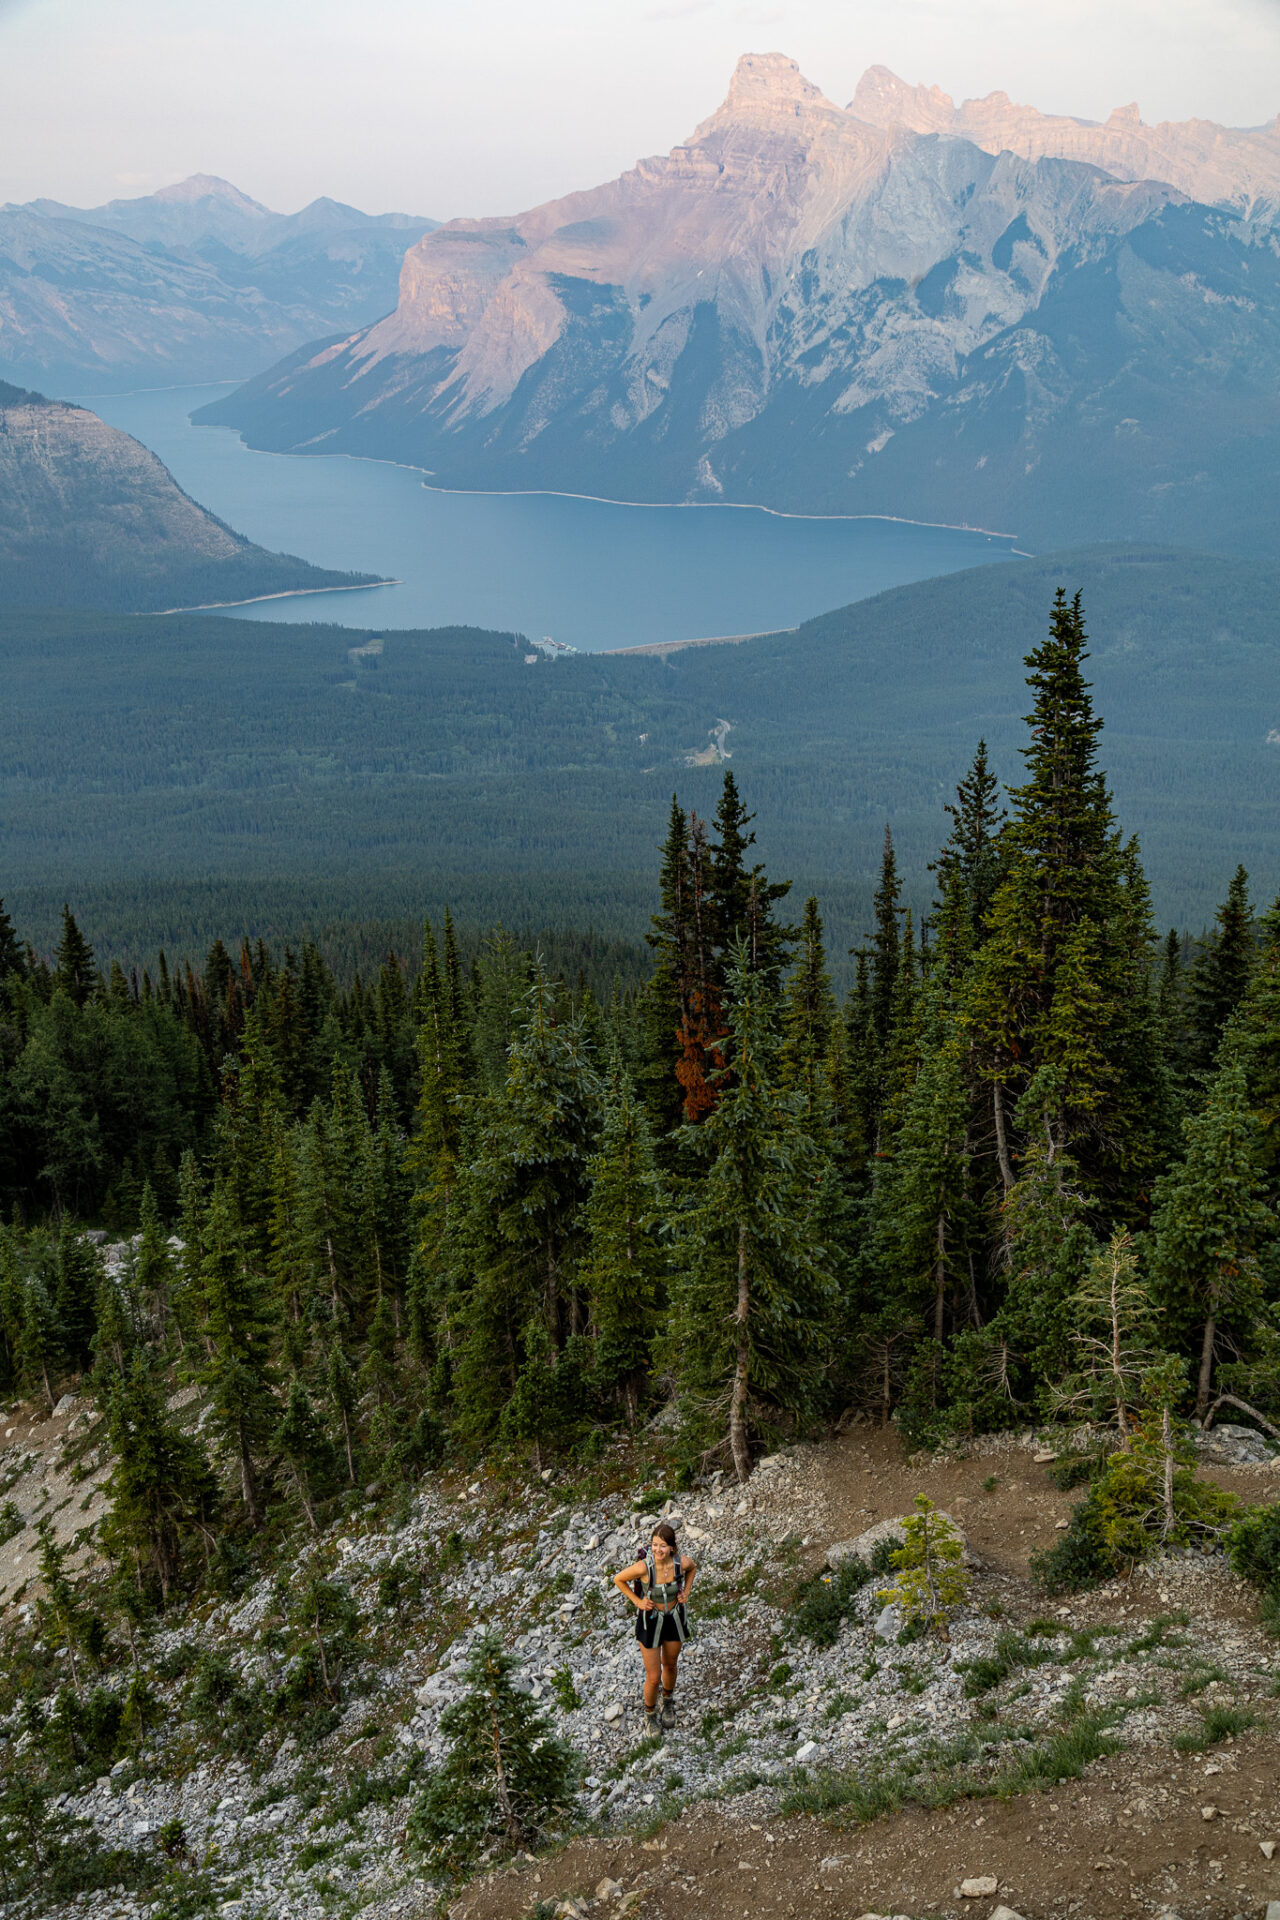
I hiked on a (very) smoky day so views weren’t necessarily great. However typically you can see south down the Bow Valley past Canmore as well as north up the Cascade Valley.
Interactive Banff Map – from a LOCAL
Get my 600+ local Banff recommendations saved to your Google Maps app
I lived in Banff for years & know all the best spots!
Outdoors: 100+ hiking trails, scrambles, backcountry routes, waterfalls & lakes
Planning: lodging, parking, restaurants, public washrooms, transit hubs, shopping & services
Things to do: tours, viewpoints, unique activities, & local secrets
Recommended Hiking Gear for the Rockies
Below are my personal recommendations and favourite products for Canadian Rockies specific hiking gear.
Backpack: I use the Osprey Sirrus 24L (men’s edition) for quick day hikes and the Osprey Sirrus 36L (men’s edition) for longer hikes requiring more gear.
Hydration: I use the 3L Hydrapak to carry water and always have aquatabs on-hand if I need to filter water.
Footwear: I currently use the Scarpa Kailesh (men’s version) and full cushion crew Smartwool socks.
Safety: I always carry the Garmin Inreach Mini 2 as my satellite device.
Here are my detailed posts for Canadian Rockies hiking gear
Rockies Hiking Gear: Winter
If you’re planning to hike the Rockies in winter, you’ll need to add a few more items to your gear arsenal.
The items below are what I use.

Spikes: I love Hillsound’s trail crampon which provides killer traction and long-lasting durability.
Snowshoes: I use TSL’s sustainable Symbioz Hyperflex snowshoe, however any snowshoe from TSL is top of the line. This one is their midrange model which offers similar features at a light weight and better price point.
Gaiters: this is my top pick for gaiters which are great for keeping water and snow out of your boots. If you’re on a budget, these ones are a little more cost effective and have plenty of great reviews.
Warmth: I use Aurora Heat’s reusable hand + ultra foot warmers for both hiking and skiing. They’re made of beaver pelt by Indigenous women in Canada’s Yukon.
Softshell Pants: these are my favourite pants (men’s sizing) for cold weather hiking. They’re water resistant, wind resistant, and warm. If you’re reading from the USA, these REI pants are equivalent: women’s sizing | men’s sizing.
C Level Cirque hike, Banff
Interactive Banff Map – from a LOCAL
Get my 600+ local Banff recommendations saved to your Google Maps app
I lived in Banff for years & know all the best spots!
Outdoors: 100+ hiking trails, scrambles, backcountry routes, waterfalls & lakes
Planning: lodging, parking, restaurants, public washrooms, transit hubs, shopping & services
Things to do: tours, viewpoints, unique activities, & local secrets
C Level Cirque hike, Banff
Happy adventuring!
Taylor ♡
Like This Post?
Share with friends or save it for later!

About the Author
HI, I’m Taylor – the voice behind The Holistic Backpacker.
After moving to Banff National Park in 2020 I became an outdoor adventure enthusiast and vowed to never stop exploring.
I now spend my days travelling the world, climbing mountains, and spending nights under the stars in the Canadian Rockies backcountry.
I created The Holistic Backpacker so I could share my adventures and help connect people like you with the same amazing experiences.